






Buying guide: which rolling pin should you choose?
Everything You Need to Know About Rolling Pins and Why You Need One
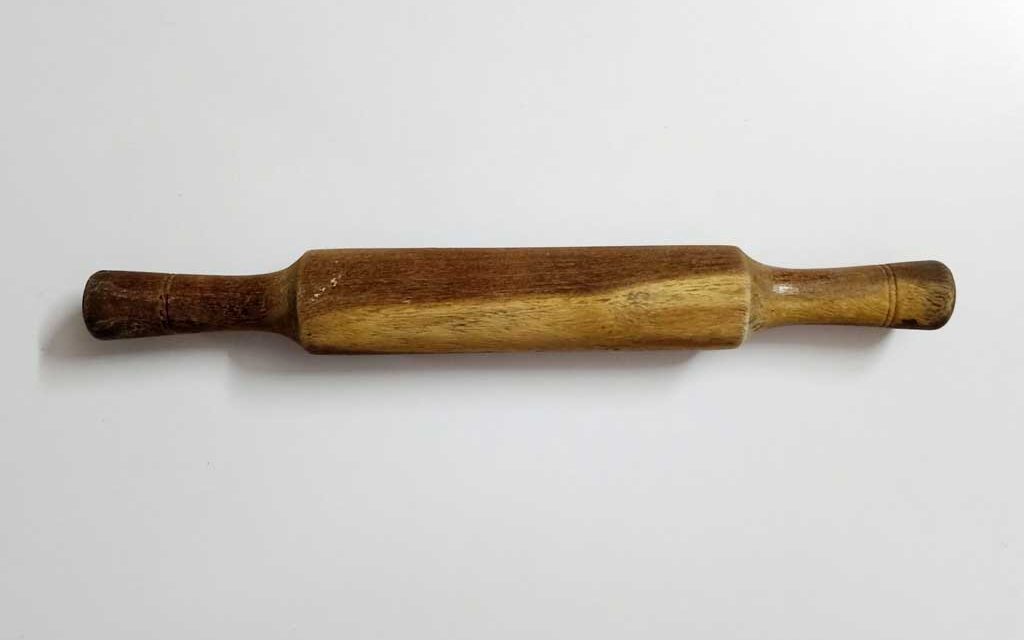
A rolling pin consists of a cylindrical body, sometimes with handles at its ends. It is typically made of wood and measures about 30 to 40 centimeters in length. Among the various kitchen utensils, the rolling pin is used primarily for rolling out different types of dough in baking.
An Overview of Rolling Pin Usage
Rolling pins are an essential kitchen tool with various uses in baking. You need them to roll out pie crusts, puff pastry, and cookie dough for cut-out cookies.
They can also be used for other kitchen tasks, such as crushing nuts, pepper, and ice or tenderizing meat. You might not need one every day, but using a wine bottle or another object as a substitute doesn’t work as easily and efficiently as a real rolling pin.
However, there is more than one type of rolling pin. So how do you use a rolling pin correctly? Here are some steps to help you roll out your dough properly.
- Lightly sprinkle flour on the surface and place the pie dough on top. Dust it with a good amount of flour to prevent the rolling pin from sticking to the dough. Coat the rolling pin with flour as well.
- Hold the rolling pin in your dominant hand and press firmly on the dough until it flattens.
- Sprinkle more flour over and under the dough. Place one hand on each end of the rolling pin. Press down on the center of the pin while rolling from the middle toward the edges in one smooth motion.
Repeat this process, rolling out other edges of the dough. Rotate the dough a quarter turn and continue rolling, always starting from the center and moving outward.
- An Italian rolling pin is heavier than a French rolling pin and flattens dough more quickly. To use it, place your hands flat on each end of the pin while keeping your fingers slightly bent. Roll the pin under your hands and over the dough, continuing to sprinkle flour as needed.
- To round out the dough, use a French rolling pin. Place one hand flat on top of the pin to anchor it over the dough. Use the other hand to roll the pin in a circular motion to create a more even, rounded shape.
- Keep rolling until the dough is completely flat. Lift and turn the dough periodically, adding more flour to the surface to prevent sticking or tearing.
Rolling Pin Materials
Wood, Marble, Silicone
Most rolling pins are made of wood, but nowadays, you can also find them in metal, marble, and silicone. Wooden rolling pins are the most traditional.
You can’t go wrong with a wooden rolling pin. Wooden rolling pins are neither hot nor cold, and they hold onto a light dusting of flour, which prevents the dough from sticking.
The idea behind metal and marble rolling pins is that they stay cooler (and can even be refrigerated), reducing the chances of butter melting while rolling the dough. This sounds great in theory.
However, in reality, air temperature and the length of time you work with your dough have the biggest impact on its firmness. These types of rolling pins also tend to be quite heavy, which may be a downside for some bakers. Silicone rolling pins, like silicone baking mats, have non-stick qualities.
You might not need to use as much flour or sugar when rolling out your dough. That said, a wooden rolling pin still requires a bit of flour, though perhaps less than you might expect to roll the dough smoothly.
Rolling Pin Shapes
There are three main types of rolling pins:
- Conical rolling pins
- Straight (cylindrical) rolling pins
- Rolling pins with handles
- Conical Rolling Pins
These are generally considered the best choice for rolling out pastries and yeasted doughs. The tapered ends make them easy to handle and allow for better maneuvering of the dough across your workspace.
As you stretch the dough, you may need to apply more force, especially with doughs that tend to retract, such as many yeasted doughs.
If you choose a conical rolling pin, avoid those with extreme size differences between the center and edges. A slight taper is ideal.
- Straight Rolling Pins
These allow for very even pressure distribution across whatever you are rolling out. They are an excellent choice for cookie dough or other items that require a consistent thickness.
This is especially useful when the final size or shape of the dough is not crucial (for example, cookie dough does not need to be a perfect circle before using cookie cutters!).
- Rolling Pins with Handles
These are typically straight rolling pins with a central rod that holds the handles in place. They are easy to grip, but applying pressure can be challenging when rolling thick dough.
Personally, I prefer a rolling pin without handles. However, in terms of grip comfort, they are hard to beat, providing the same convenience as a straight rolling pin without handles.
What Are the Different Types of Rolling Pins?
Every baker has a favorite rolling pin, whether it’s one they purchased themselves or inherited from a family member. Even though rolling pins may seem like simple and straightforward kitchen tools, there are various types available.
Some are better suited for specific tasks or experience levels.
This raises the question: Which rolling pin is right for you? Here are the pros and cons of different rolling pins you should consider when shopping!
- Classic Wooden Rolling Pins
Classic rolling pins are typically made of wood and feature a smooth cylindrical roller with two easy-to-hold handles.
- Advantages of Classic Wooden Rolling Pins
- Ease of Use
These models are the most popular for a reason: they are easy to handle and work well. As such, they are a great choice for beginner and recreational bakers.
- Uniform Dough Thickness
With a large flat roller, you can easily achieve an even thickness in your rolling.
- Easy to Clean
Wooden rolling pins take only a few moments to clean with warm soapy water.
- Disadvantages of Classic Wooden Rolling Pins
- Heavy
Depending on the model you get, a wooden rolling pin can be quite heavy, especially if the handles are screwed in.
- Maintenance
As with most wooden kitchen utensils, your rolling pin may require periodic maintenance. Otherwise, it may not last as long as you want. If your rolling pin starts to crack or dry out, rub it with mineral oil using a washcloth.
Classic Wooden Rolling Pins Are Good For:
Beginners and general use. These can be used for most rolling tasks (pastry dough, pizza dough, cookie dough, etc.), but they are not as sophisticated as some other options.
- Marble Rolling Pins
Who doesn’t love the look of marble in the kitchen? Marble rolling pins work the same way as classic wooden models, but the barrel is made of stone. Some products have wooden handles, while others are entirely made of marble.
- Advantages of Marble Rolling Pins
- Appearance
There’s no denying the visual appeal of this rolling pin. When purchased with a stand, it can be proudly displayed on your countertop as kitchen decor.
- Easy to Clean
Marble is durable, making it easy to clean dough off the surface.
- Disadvantages of Marble Rolling Pins
- Very Heavy
Beauty comes at a price. Marble is essentially rock, making this rolling pin much heavier than others. This makes it more uncomfortable to handle, and you may struggle to gauge the thickness of your dough accurately.
- Sticky
You’ll want to have plenty of flour on hand when rolling with marble. Dough tends to stick to it, so make sure to coat your rolling pin with flour before you start and periodically dust the marble surface as you roll.
- Conductive Material
Marble has excellent thermal conductivity, meaning it cools and warms up very quickly. This can cause some difficulty when working with your dough.
When you roll the pin back and forth on chilled dough, the marble will transfer heat from your hands to the dough, which is usually the opposite of what you want.
Marble Rolling Pins Are Good For:
Dough that needs a heavy hand, such as overly cold dough. Use the weight of the marble to work the dough and make it pliable again.
- French Rolling Pins
French rolling pins come in different materials, but you will most commonly find them in wood. This style eliminates the handles of classic rolling pins.
It is essentially a long stick. The middle is thick, but the ends taper, mimicking conventional handles without disrupting the consistency of the roll.
- Advantages of French Rolling Pins
No handles! No handles, no problems. (Well, some problems. We’ll get to those. But mostly no problems.) Handles screwed into a conventional rolling pin can become sweaty, loose, or rust over time. Plus, their removal allows for a smoother rolling experience.
- Easy to Clean
French rolling pins are even easier to clean than classic rolling pins because there are no crevices where dough and flour can hide.
- The Baker’s Choice
Professional bakers tend to gravitate toward French rolling pins, especially when working with pastry dough.
- Disadvantages of French Rolling Pins
- Learning Curve
It takes time to learn how to use this type of rolling pin. Since it has tapered edges, it’s easy to accidentally roll with a curved edge or misjudge where your rolling pin ends and your handle begins. Don’t expect to be a pro right away.
- Dough Inconsistencies
If not used correctly, your French rolling pin can leave thick spots in one area and thin spots in another.
French Rolling Pins Are Good For:
Pastry dough and experienced bakers—or anyone who enjoys a challenge!
- Rolling Dowels
Simple, consistent, and effective. Rolling dowels don’t have anything fancy about them. They are just long, smooth cylinders, but they often offer superior performance and incredibly easy cleaning. As such, it’s no surprise that this model ranked highly when we tested the best rolling pins.
- Advantages of Rolling Pins
- Uniform Dough
Since the rolling pin is made of a single material and a single size, you get consistent results every time. Minimal pressure, minimal maneuvering. It’s every baker’s dream.
- Perfect Weight
Rolling pins are neither too light nor too heavy, meaning they apply just the right amount of pressure on the dough with each roll.
- Total Control
Unlike other rolling pins where you might worry about loose handles or tapered edges slipping into places they shouldn’t, rolling dowels give you complete control over the pin.
- Easy to Clean
This style of rolling pin is one of the easiest to clean, as its simple design has no crevices.
- Disadvantages of Rolling Pins
- Bulky
Since it’s essentially a very large kitchen stick, rolling dowels can feel bulkier than other rolling pins.
- Storage
Rolling pins can be quite long, so make sure you set aside a dedicated space in your kitchen for this pin to call home.
Rolling dowels are good for:
Pizza dough and everything else. Rolling pins work well for all types of dough, but for those of us who struggle to get that perfect consistency on a pizza, this is the rolling pin of choice.
- Engraved Rolling Pins
Rolling pins with pretty patterns are a great gift for bakers who already own a standard rolling pin. But ultimately, they are not useful for conventional rolling tasks.
- Advantages of Engraved Rolling Pins
- Design
Engraved pins can create cool patterns on cookies.
- Appearance
If your engraved rolling pin has a festive design, it can be part of your kitchen décor.
- Disadvantages of Engraved Rolling Pins
- Everything Else
You will need a regular rolling pin to flatten your dough. And you only get one chance to roll an engraved pin—if you go back and forth, the pattern will be ruined. Plus, it’s difficult to clean all those tiny crevices.
Engraved rolling pins are good for:
Novelty and/or kitchen decoration, honestly. You can also gift it to the baker who has everything.
With the right rolling pin in your kitchen, making sugar cookies, pizza, pie dough, and more will be a quick and easy task.
Just make sure to consider your experience level and primary goals when choosing between classic, French, marble, and rolling dowel pins.
How to Choose a Rolling Pin?
Rolling pins can become both an obsession for kitchen tool collectors and a great source of pride for cooks who love baking.
Because they are important for your baking and are frequently displayed in the kitchen as a work of art in themselves.
Choosing the right rolling pin for your needs is not as simple as it may seem. There are many different materials available, each with its own advantages and disadvantages.
- Choose Between a Rod or a Roller
A rod (also known as a French rolling pin) is a piece of wood that is either a straight dowel, tapered from the center, or tapered at the ends.
A roller is a round wooden cylinder attached to an internal axle, with two handles on the ends to push and make it roll. They feel different from one another.
You can make your choice based on your preferences. You may even notice that they don’t serve the same functions in the kitchen. So, familiarize yourself with them before making a purchase.
- The Rod is Easier on Your Hands and Wrists
You place your palm on each end and roll by applying even pressure on the dough. However, your hands do touch the dough. Some people enjoy this “dough feel” as a technique in itself.
But touching too much may heat the dough due to the warmth of your hands, requiring you to work quickly. The rod is generally cheaper than a rolling pin and has the added advantage of not having crevices that could trap random bits of dough.
- The Rolling Pin is Used by Holding the Handles and Rolling the Cylinder Over the Dough
The downside is that you need to apply more force to the dough, and as a result, the dough is not stretched as evenly as with a rod since you exert pressure unevenly.
- Some Rolling Pins Are One Piece with Handles
A hybrid between the two types of rolling pins.
- Consider a Wooden Rolling Pin
Wooden rolling pins are traditional and can be made from a variety of wood types, including aromatic wood. If you have a large rolling pin, it will be heavier.
- Many Wooden Rolling Pins Stick to Dough
This can be a real issue, especially if adding too much flour makes the dough overly floury. However, some woods are better than others. Look for an oilier wood that won’t stick as much.
A wooden rolling pin cannot be refrigerated for pastry that needs to stay really cold. Wooden rolling pins can also mark more easily than other types.
- Check Out Marble Rolling Pins
These rolling pins are heavy, but they stay cold (especially if pre-chilled). There is no heat transfer to the dough. However, if you have very heavy rolling pins, they can help crush more delicate pastries.
If you get one, make sure its internal axle is very securely attached and not prone to wobbling out of place.
- Marble Tends to Chip
It is usually purchased with a provided wooden stand; always make sure to use this stand when cooling and storing the rolling pin.
- Try a Stainless Steel Rolling Pin
These have a very “chef-like” appearance and retain cold well. They are always easy to clean and are generally very well balanced. However, they are heavy and can feel too cold to the touch. Some metal rolling pins can be filled with water, similar to glass ones.
- Consider Non-Stick Rolling Pins
With a non-stick rolling surface, it is easier to roll your dough. There are rolling pins made of plastic, silicone, and other non-stick surfaces.
Can they be cooled? Checking this feature on your non-stick rolling pin would be important. The advantage of silicone rolling pins is that they are not sticky and are very easy to clean.
- Explore Glass Rolling Pins
Glass rolling pins are designed so that cold water can be poured inside to keep them cool for rolling dough.
Read the instructions that come with a glass rolling pin to determine the proper water temperature. If the water is too cold, the rolling pin may sweat, transferring liquid to the dough.
- Choose an Appropriate Length
This length should not be an obstacle unless you frequently make large sheets of dough, such as for pasta. In this case, you need a long rolling pin of significant length.
The standard length for a French rolling pin is 50 cm, while 30 cm is standard for wooden and metal rolling pins. Marble rolling pins tend to have a length of 25 cm. Do not choose a longer one for regular dough work, as it will be too complicated to use.
- Check the Following Before Finalizing Your Choice
- The handling is comfortable and easy to use
- The balance feels good
- The surface does not stick to the dough or warm it up
- It is easy to clean.
- Consider Having Multiple Rolling Pins of Different Types
This allows you to switch rolling pins between baking recipes and display them as décor. There are also specialized rolling pins that imprint decorative patterns. These are for the serious baker with a specific design in mind, such as marzipan, pasta, shortbread, gingerbread, fondant, etc.
How to Maintain Wooden Rolling Pins
One of the most popular rolling pins is the wooden rolling pin. This type of rolling pin is particularly comfortable for the hands and arms when used to flatten dough.
Whether you want to make cookies, biscuits, or a pie, a wooden pin will do the job. If you are interested in purchasing a versatile classic rolling pin, a simple maple wood rolling pin could be a great asset to your kitchen.
Wooden rolling pins will last virtually a lifetime with very little trouble. However, a wooden rolling pin requires some care and attention to last longer. The key is simply not to leave it in water.
- Before Storing It
You must also dry it completely. Once you have finished baking, wash it immediately by hand in warm, soapy water.
Make sure to use only a plastic scouring pad. If dough residue is difficult to wash off, rinse your rolling pin thoroughly and dry it completely with a towel. You can store it anywhere in your kitchen, but a drawer or cabinet is preferable.
What about soap? Or bleach?
Some people recommend avoiding soap when washing wooden rolling pins. However, most dish detergents are perfectly safe as long as they cannot penetrate the wood.
Any mild detergent that can be used to wash a wooden-handled knife or a wooden cutting board is acceptable for more effective cleaning, especially if your rolling pin has been collecting dust for a while.
You can soak your rolling pin briefly in soapy water or a bleach solution (one tablespoon of unscented bleach per gallon of water).
An alternative to soaking the entire pin is to wrap it in a cloth soaked in the solution. Simply rinse and then dry your rolling pin before storing it, and never use heat to dry your rolling pin.
Should I season my rolling pin? And with what?
Many people recommend seasoning your wooden rolling pin, although this is usually unnecessary for pins that have been properly maintained.
To season your rolling pin, first make sure it is clean and dry, not dusty or damp. Moisten a clean cloth with a small amount of food-grade mineral oil, butcher block oil, or salad bowl oil.
Then lightly wipe the entire surface of the rolling pin. If there is excess oil, use a clean cloth to remove it. The handles do not need to be seasoned.
- You should never use vegetable or olive oil to season a wooden rolling pin
As these can become rancid and add unwanted flavors to your baking. You should also avoid using any oil that is not certified food-grade. Mineral oil is generally safe.
If it is found in the pharmacy section, check the label. If you prefer to season your rolling pin, you do not need to do it after each use. Seasoning once a year should be sufficient unless you use your rolling pin more than twice a week.
What about mold?
Unfortunately, mold can end the life of your wooden utensils and rolling pins. While you can kill some mold with bleach, there is no guarantee that all mold spores won’t be hiding inside the porous surface of your wood. Mold stains are also impossible to remove without resorting to sanding.
Or using harsh chemicals that are just as bad for your wooden rolling pin (or rather the food you cook with) as the mold itself.
Conditioning Wooden Rolling Pins
In general, it is not necessary to condition wooden rolling pins. Simply washing and thoroughly drying your pin is often enough to maintain it long-term. In fact, wooden pins can be extremely old and still be in excellent condition.
However, if your pin has been exposed to too much heat, the wood may crack. This happens when you excessively dry your rolling pin, which is one of the reasons why dishwasher washing is not recommended.
The heating cycle dries out the wood easily, and a long washing cycle can also over-soak it. To restore your rolling pin, try using olive oil that you would use in a salad.
Or food-grade mineral oil to rub it in. This type of conditioning treatment is also safe for wooden bowls and breadboards.