










Choosing the right vegetable mill and potato masher!
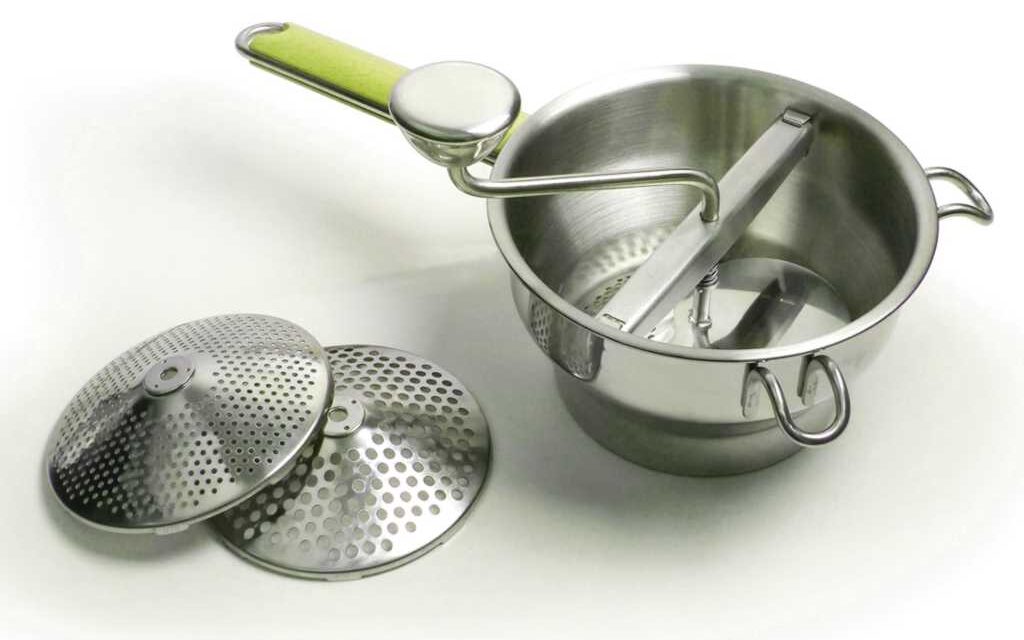
The Food Mill or Passe-Vite
The food mill, also known as a “passe-vite,” is a kitchen appliance used to grind or puree food, such as soups, sauces, or mashed potatoes.
It can be used during canning or preserving to produce a smooth purée without seeds, skins, or stems. It can be used with both hot and cold foods. It may also be called a rotary mill or vegetable press.
How Does a Food Mill or Passe-Vite Work?
A food mill is generally a manually operated device with a crank on top. It has the shape of an inverted cone with a wide opening and legs or protrusions to place on a bowl.
This keeps it stable while you pour in the food to be processed as you turn the crank. The bottom is perforated, straining the mashed food into the receiving bowl.
A grinding plate is attached to the crank. When you turn the crank, the food is crushed against a perforated disk at the bottom of the mill, filtering through the sieve holes into the bowl below.
Food mills often come with interchangeable perforated sieve disks, allowing you to obtain finer or coarser purées. By reversing the crank direction, you can extract as much as possible.
After extracting the purée, seeds, skins, and other debris are pushed to the top of the grinding plate. You can then easily turn the food mill over a trash bin or compost bin to discard the waste.
Why Food Mills Are a Better Choice
The food mill or passe-vite bridges the gap between a sieve and a blender, making it a highly efficient and useful kitchen tool. Some of the most common uses for a food mill include removing seeds from cooked tomatoes for tomato sauce and extracting pulp from certain foods (like applesauce). You can also use them for making mashed potatoes. Focus on the material, size, and sieve disks when choosing one.
The best food mill will also be easy to clean. For example, plastic may leave a slight taste for sensitive palates and is not usually dishwasher-safe. A plastic model won’t last as long as a stainless steel mill.
Uses for a Food Mill or Passe-Vite
You can use a food mill to make applesauce or tomato sauce, with the advantage of being able to add hot, unpeeled, or unseeded fruits or vegetables and produce a purée without seeds or skins.
This results in less food waste compared to peeling or seeding manually. Often, only a small amount of debris and seeds remain after processing, which can be composted or discarded.
Food mills can be used to prepare baby food or purées for people with dietary restrictions requiring soft foods due to chewing or swallowing difficulties.
Duchess potatoes or other mashed dishes can also be made using a food mill or potato ricer.
Food Mill vs. Food Processor
Food mills are simple, mechanical, non-electric kitchen tools. They are usually dishwasher-safe and can be used with hot or cold, soft, semi-solid, or mostly liquid foods.
Food processors do not filter out seeds and skins. If you process a tomato with skin and seeds in a food processor, you may end up with a grainy texture because they are chopped but not liquefied.
A food mill effectively filters to ensure the sauce has no seed or skin fragments. Food processors are better suited for solid foods that cannot be effectively processed with a food mill, such as cheese or nuts. Foods processed in a food mill must be soft, often steamed, baked, or boiled before processing.
Should I Use a Food Mill or a Sieve?
A sieve is a great tool when simply separating solids from liquids. If you are draining pasta, removing liquid from soft foods to create a pulp, or even sifting flour or sugar while baking.
The sieve is the perfect tool. However, if you are working with foods that require actual breakdown, you’ll need something with more force and power. That’s where the food mill comes in.
A food mill has the ability to crush and press soft foods, allowing for easy straining, whereas a sieve requires a tomato to already be pulped to drain the liquid. A food mill actually does the processing for you.
Types of Food Mills
- Standard Food Mills
Standard food mills eliminate the need to peel or seed produce before making sauces and purées. They consist of a bowl with an interchangeable perforated bottom (similar to a strainer).
These food mills are ideal for processing small batches without the hassle of setting up a much larger unit.
- How Does a Standard Food Mill Work?
Food is placed in the bowl, and the crank is turned to process the food. With each turn, a semi-circular blade sweeps, compresses, and scrapes the food. At the same time, the food mill bar applies constant pressure against the cutting plate, holding back seeds, skin, and fibers.
- Continuous Food Mills
Continuous food mills work similarly to standard food mills. The difference is that these have a higher output. They are ideal for puréeing large quantities of tomatoes for tomato-based sauces.
- How Does a Continuous Food Mill Work?
Food is placed in the bowl and then channeled down into the sieve. Here, the purée is extracted while seeds and skins are continuously removed. A tray directs the purée into a separate container, while the waste is deposited to the side of the unit in another container.
Manual vs. Electric Food Mills
Food mills are available in both manual and electric models. Electric models save a lot of labor but can be more expensive and require more space.
Conversely, manual models may be more affordable and take up less space, but the effort required to process food can be significant, depending on the quantity of food you need to prepare.
- Manual Food Mills
- Ideal for processing small batches.
- Requires manual effort to extract the puree.
- The user operates the handle to push the food through the mill.
- Economical and space-saving.
- Components of a Manual Food Mill
A classic kitchen component, manual food mills consist of three main parts: a crank, a bottomless bowl, and an interchangeable perforated disc.
- Electric Food Mills
- Ideal for processing large batches.
- Takes the effort out of puree extraction.
- An electric motor pushes food through the mill.
- Can be bulky, cumbersome, and more expensive than manual models.
Choosing the Right Food Mill: What to Look For
Look for a spacious bowl, sturdy construction, interchangeable discs, and a blade that reaches close to the bottom of the mill. A food mill is essentially a sieve with muscle.
No other tool can mash and strain food more cleanly and efficiently at the same time. Most food mills have fundamentally the same features, but there are some differences in their operation. Here are some key factors to consider when choosing one:
- A Handle and Hooks or Loops to Attach to a Bowl
These allow the mill to sit securely or hang inside a bowl so that the milled food falls into the bowl rather than onto the counter. Configurations vary.
All the models I tested wobbled slightly while turning. Make sure the mill can sit firmly on a pot or bowl.
- Interchangeable Discs
Most come with these interchangeable discs. If you plan to use a food mill for more than just mashed potatoes, you’ll need different hole sizes for various levels of fineness.
- Capacity
A deep, generously sized food mill is useful in many ways. It allows you to complete the task in one or two passes rather than in small batches, and food is less likely to spill over.
Additionally, larger food mills save you from washing extra dishes. Drain an entire pot of boiled potatoes directly into a large-capacity mill.
Mash the potatoes in the boiling pot, and you’ve saved yourself from washing a colander and an extra bowl. Opt for at least 2 liters; 3 liters is even better.
- The Blade
This is what gets close to the disc. The least effective models I tested caused food to swirl around inside rather than forcing it through the disc. This was due to a highly slanted blade.
The steep angle created too much space between the blade and the disc, causing food to be swept around the mill instead of being pushed through. Look for a slightly inclined blade that sits close to the sieve disc.
- The Grip
On some models, the perforations are stamped from the outside, leaving raised edges inside the device. These edges grip the food so the blade can push it through the sieve.
Rather than sweeping it around the bowl, high-end domestic versions feature polished perforated disc edges.
However, the blade edge is angled downward by about ¼ cm, which helps grip food pieces and push them through more efficiently.
- Easy Assembly
The food mill should be easy to disassemble for cleaning and reassemble afterward.
- Price
There is good value in all price ranges. Food mills range in price from 15 to 200 euros. Cheaper models cost between 15 and 35 euros.
High-end food mills range from 160 to 200 euros. You can buy one according to your financial capacity. They feature sleek designs and heavy-duty stainless steel construction.
Consider Buying a Large Food Mill
A professional chef will always insist that you buy a large food mill. It makes the most sense, as most foods you process (and most meals you prepare) are in large batches. If it’s too small, you’ll need to process multiple smaller batches. Once you own a food mill, you’ll never mash potatoes any other way. Potatoes can be quite large, and you’ll want to process more than just a few at a time.
The Potato Ricer
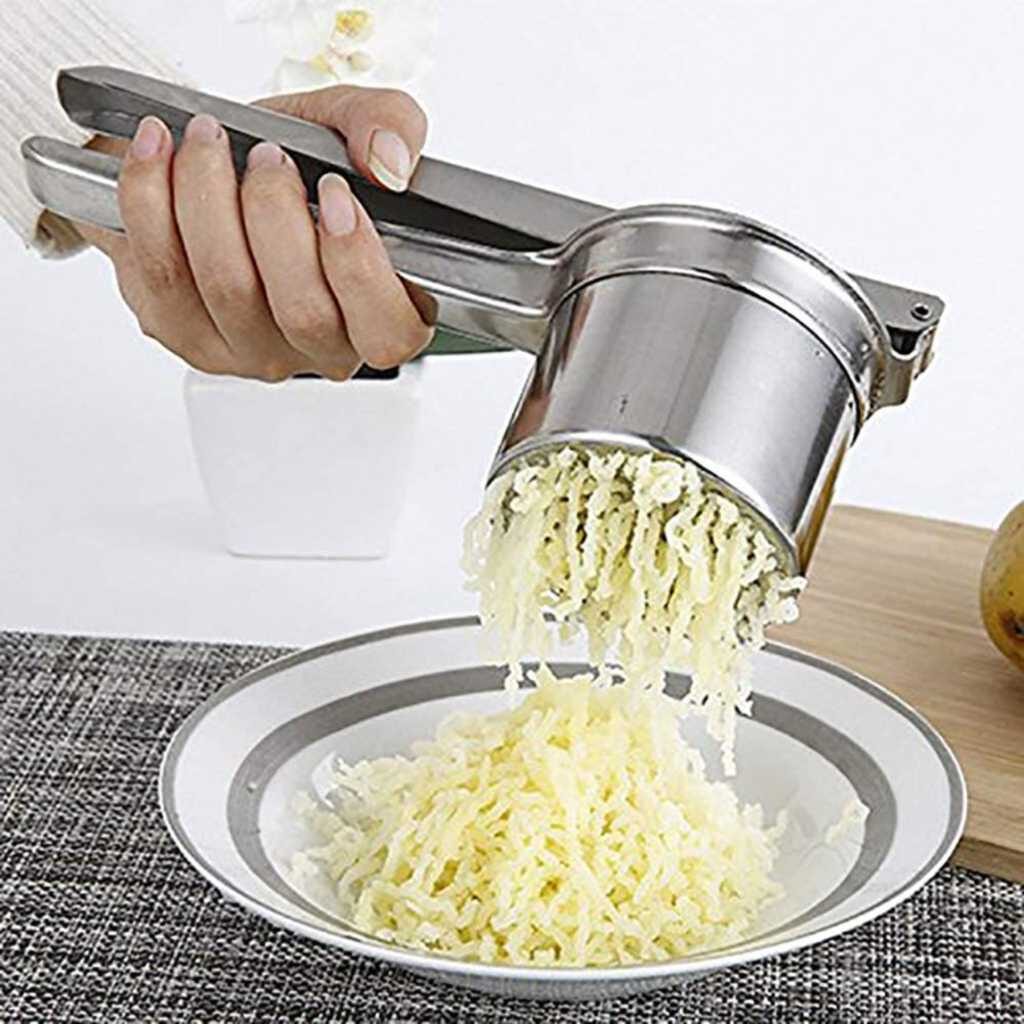
If you’re familiar with a garlic press, you have a general idea of how a potato ricer works. It’s a kitchen tool with two long handles—one attached to a basket with small holes, and the other ending in a flat piece that fits into the basket.
Chunks of boiled potatoes are placed inside the basket and then pressed through the perforations.
The potatoes emerge on the other side looking like rice (hence the name). This method allows for quick and easy mashing, resulting in a smooth, creamy texture.
Why Should You Get a Potato Ricer?
- Get Perfectly Mashed Potatoes Every Time
You don’t have to go to a restaurant to enjoy perfectly mashed potatoes. Gone are the days of simply settling for homemade mashed potatoes that aren’t as fluffy and soft. With a potato ricer, you can achieve restaurant-quality mashed potatoes in the comfort of your home.
- Save Time on Preparation
You don’t need to boil potatoes for a long time. Even microwaved potatoes can have that perfect fluffy texture in less time with a potato ricer. All you need to focus on is the flavor—and of course, the gravy.
- Use It to Make Other Delicious Treats
Did you know you can use a potato ricer for other fruits and vegetables? It can even be used to make egg salad, chop nuts, and prepare oriental delights like hummus. It’s up to you to get creative and explore many recipes you can make with a potato ricer.
How to Use a Potato Ricer?
A potato ricer can be used for white potatoes or sweet potatoes. You can also use it to press other types of food.
Such as parsnips, turnips. Or even make fruit coulis. Or small amounts of baby food. Some ricers will come with a choice of disks.
These are disks of different hole sizes. The hole size will determine the quality of the mash. Here’s how you should use a potato ricer to make creamy mashed potatoes.
- Peel several white potatoes (or your preferred potato for mashing). Then cut them into your desired sizes. The pieces should each be about 3 cm cubes. Cooking time will be around 15 minutes.
The time can also depend on you. If you want even softer potatoes, the cooking time will increase. They should break when pressed with a fork. Strain your potatoes through a colander to drain the water. Leave them in the colander or put them back into the empty pot. - Fill the basket with a few potato pieces. If your potato ricer comes with a choice of disks, place the ricer with the one with the largest holes. And fill the basket with a few potato pieces.
- Hold the ricer over the empty pot or a bowl and squeeze the handles together until the potato starts coming out through the holes. Keep filling and pressing the potatoes.
Work quickly before the potatoes cool down. Be sure not to overfill the ricer basket, or the potatoes might ooze out the sides. - When all the potatoes have been processed in the ricer, add the desired ingredients to your potatoes. Such as butter, sour cream, warm milk, salt, pepper, or nutmeg. Stir with a wooden spoon to combine.
You can put your mashed potato pot back on low heat to warm up the potatoes before serving.
Clean, or at least rinse, the ricer immediately after use. So that the starchy potato residue does not dry on the tool, making it difficult to clean later.
Using Your Potato Ricer for Other Foods
Potatoes are not the only type of food you can quickly mash with a potato ricer. Here’s how to use your ricer for other foods.
- Thaw frozen berries or cook fresh berries in a saucepan with a little sugar to soften them. Fit the ricer with the disk with the smallest holes. Then press the berries through the ricer into a bowl to make a coulis or fruit sauce.
- Steam foods like apples, peas, or broccoli. Use the ricer fitted with the disk with the largest holes to mash food for baby food.
- Use the ricer to press dough into boiling water, forming noodles.
Are There Different Types of Potato Ricers?
Potato ricers are often overlooked as kitchen utensils. But don’t be mistaken. These tools are practical and important, especially if you frequently cook mashed potatoes or other root vegetables.
When it comes to making mashed potatoes, nothing beats a good ricer. Potato ricers come in different styles and are made from various materials.
- Stainless Steel Potato Ricers
Stainless steel ricers are our favorite to use here in the cooking season. The stainless steel properties make these products extremely durable and efficient.
When mashing food, stainless steel is also heat-resistant and usually dishwasher-safe. This makes them our preferred models, partly due to their ease of cleaning.
- Plastic Potato Ricers
Plastic ricers are generally the most comfortable to use. But they tend to be more prone to bending or breaking. Plastic is less durable than metal and can sometimes warp when put in the dishwasher.
These models usually fall into the cheaper price range. So, you can buy one based on your budget. However, they may wear out over time. These tools are often portable, with a long handle connected to a wide head.
Often flat (or the mashing part), allowing you to push down and apply pressure to crush and “mash” the fruit or vegetable of your choice. To get the best performance from a ricer,
Make sure your potatoes are boiled or heated before using it. Heat helps soften starchy foods, an important factor that makes the mashing and mixing process less labor-intensive.
- Standard Potato Ricers
The head of a standard ricer is often grooved or wired. This allows for maximum efficiency when mashing food.
Usually found in a “wave” shape, these types of ricers are ideal for light tasks. They can easily handle a few potatoes but may not work as well with larger quantities of food.
The ridges on the head help break up the mashed food. An underrated but effective method when preparing food during cooking.
How to Choose the Best Potato Ricer?
Whether you already have a well-used potato ricer or just moved out of your parents’ house into your own apartment or home,
A potato ricer should be at the top of your must-have kitchen utensils list. To get the best performance from your ricer, consider the following elements:
- A Simple Yet Effective Design
Most potato ricers have a simple design. A closed, transparent triangular structure consisting of a mashing head and a handle. A simple design. However, they have strong capabilities to give you well-mashed potatoes.
Some manufacturers design their ricers with a vertical design and a rectangular or round mashing plate. There are also horizontal designs, consisting of a wide handle.
You might want to try an effortless approach to mashing potatoes using an electric potato ricer. Why not try a super-smart masher
That operates electrically and gives you perfect results without any effort on your part? There are even ricers designed for fashion-conscious gourmet cooks. Besides the general design, traditional or modern, you should also consider the material of the masher. Such as stainless steel, plastic, or nylon.
- Stainless Steel, Silicone, or Nylon
A potato masher can be made of rust-resistant stainless steel, while other models are made of durable silicone or nylon. The material is an important aspect to consider.
Because it can affect the overall quality and performance of the masher. We can tell you that stainless steel is the most commonly used material. Because it is well known for its high resistance to rust.
And it is also strong and sturdy. Silicone is durable and comfortable to use. Choosing nylon as a material is also a good choice. Because it is strong. However, it may not be the best option.
If the potatoes to be mashed are of large sizes. One of the advantages of a nylon or silicone masher is that you can use it on your non-stick cookware. So you don’t have to worry about the mashing plate scratching the surface.
- Size
Mashers come in different sizes. While size can determine how easily the masher can be maneuvered in the bowl.
And especially when it comes to mashing a large quantity of potatoes. It will also determine if it can fit in your cutlery drawer. The most important aspects are the mashing plate or head and the handle.
- Mashing Plate
The mashing plate or head is the part of the masher that comes into direct contact with the potato. The plate can vary in size and can be a small traditional round plate measuring 10.05 cm.
Or a larger rectangular plate measuring 12 or 15 cm. If the plate is larger, you can mash the potato much faster.
However, the larger size may be difficult to maneuver in a small bowl. Most manufacturers design their mashers with the traditional round or rectangular perforated plate.
Which may have holes of the same size or a mix of large and small holes. Regarding rectangular and round plates, they provide excellent mashing performance. However, zigzag-shaped ones also offer performance that requires minimal effort.
- Comfortable Handle
One concern people have about a masher is that it can cause a lot of discomfort in the hand. This can be an issue if you suffer from arthritis or a hand or arm injury.
Even if you don’t have arthritis or a hand or arm injury, mashing potatoes can be a tough task. Especially if your potatoes are hard. Look for a masher with an ergonomic handle.
All these additional features will make the masher easy to control and relieve your hand. A masher with a horizontal handle is particularly effective. It allows you to have a better grip on the handle and apply more pressure.
- Easy Cleaning
The hardest part to clean is always the mashing plate. There have been times when I washed my own masher only to find food still stuck in the holes.
So, if you have experienced this with your old masher. Or if you are new to the wonders of a masher. Look for one that is easy to clean.
- Frequency of Use
If you plan to use your masher frequently, it’s probably worth spending more money on a higher-end model. Most of the more expensive mashers are made from high-quality materials. And can withstand use several times a week without damage.
- Storage Space
Due to their unusual shape, mashers can sometimes be difficult to store. Many standard mashers do not fit into regular kitchen drawers. But some have a small hole at the top of the handle. Allowing you to hang them on the wall.
- The Head
The head of the masher is the part that comes into contact with the food and creates the desired texture. There are several different head styles. Most commonly, you’ll see them made of stainless steel.
And they are generally either flat plates with holes or curved metal loops. Mashers with metal heads are sturdy. But they require more effort to achieve a good mash.
Flat mashers can crush more food at once. But food can often get stuck in the holes.
- Handling
Most masher handles are vertical. They are typically made of metal. Although they sometimes contain plastic or silicone. The best mashers have an ergonomic design.
Making them more comfortable to hold for long periods. Sometimes, you can find a masher with a horizontal handle.
These are the best for those who do not have a lot of hand or wrist strength. As they provide more leverage. These mashers are not always easy to find. But those who use them tend to swear by them.
- Price
Most mashers cost between 10 and 15 euros. Within this price range, you can find almost any style and quality of masher. With different prices, you will likely find more metal in the construction of the masher.
Maintenance and Care
Mashers are generally easy to clean and maintain. Most models can be washed in the dishwasher. And it is important to clean them after each use. Because these products are designed to mash and break down food intimately.
The holes in perforated models provide many crevices. Where bacteria can cling and multiply. If you do not clean it properly. And it is important to ensure that food is thoroughly washed off after use.
Before placing it in the dishwasher, we recommend thoroughly rinsing it under the tap. If you don’t have a dishwasher available, make sure to use a sponge to completely scrub the masher. Dish soap and hot water will do the job just fine.
We like to soak our potato mashers in warm soapy water for about 10 minutes after each use. Before removing and thoroughly drying them with a fresh dish towel.
Wave-shaped mashers require a more delicate touch than other models. They are generally less sturdy than perforated models. And can bend under pressure.
So be sure they are not crushed under heavier tools and appliances when stored.